
Affordable DIY Van Awning
We planned on getting a Fiamma F45 S awning for Gidget, we even bought the special mounts from Aluminess to mount it, but after going on a few trips now we’re not so sure anymore. At a cost of around $1000 the Fiamma awning is expensive enough to make us think twice about it.
For the type of adventuring we do, always on the move seeing sights, we don’t tend to set up camp in anyone spot for very long. And if we do park it for a few days, a quick deploying awning isn’t crucial.
At about $140, our DIY awning can be deployed in about 15 minutes and cost significantly less than the Fiamma option.
Parts:
- 2 to 4 Nite Ize Figure 9 Rope Tightener – Large: $16
- 100 feet of Paracord: $10.50
- Rubber Mallet with Tent Peg Remover: $5
- Tent Stakes for firm ground: $10
- Tent Stakes for sandy or loose ground: $27
- 4 carabiners: $10
- 10′ x 12′ Heavy Duty Tarp: $17
- 2 Tent Poles: $31
- 4 hose clamps if attaching to a tubular roof rack
- 4 D rings if attaching to a tubular roof rack
- Scrap pieces of rubber to protect roof rack
Instructions:
A carabiner is used to attached the tarp via a grommet to the roof rack (Aluminess). On the roof rack 4 hose clamps and small D rings, picked up from Home Depot, are used to make an attachment point for the carabiner.
By using carabiners we can quickly connect the tarp to the rack.

The tarp is attached to the roof rack with a carabiner.

From the underside of the tarp you can see the 4 connections points between the tarp and roof rack.
The other side of the tarp is help up by 2 adjustable tent poles.

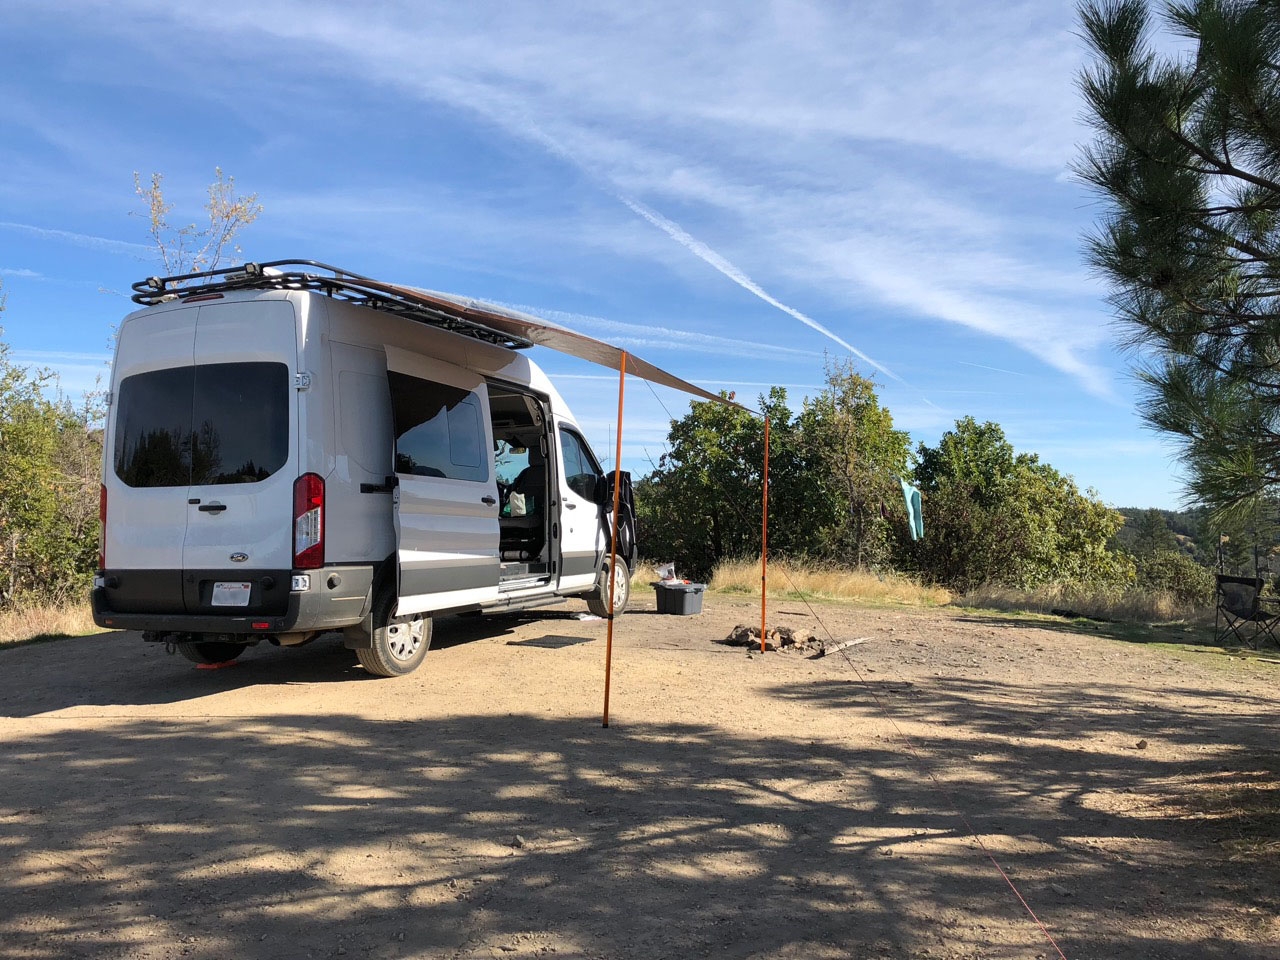
Completed Awning
The tent poles are anchored to the ground using paracord guy lines, rope tensioners, and stakes. We have found that 1 guy line per pole is good enough if the wind gust never go over 10 MPH. If we’re in a windier location we will use multiple guy lines per pole. This technique means our DIY awning can withstand much higher winds than the Fiamma F45S awning. Worst that will happen is our $20 tarp will need replaced.
It’s not shown in the pictures, but we also carry stakes for loose ground like beach sand.

Cheap steel stakes will work for firm ground.

We use a rope tightener instead of knots as it’s much quicker and easier to disassemble.
A DIY awning like this is simple and can be deployed in about 10 to 15 minutes with practice. It’s affordable so if it ever breaks or needs replacing it’s not a big deal.
We may still get the Fiamma 45 S but for now we are happy with our DIY awning.
For a similar DIY awning write up check out our friends The Vanna Project. Their install covers more of the slider door opening.

When the awning is fully deployed it produces a lot of shade. But that only works for half the day or so. When the sun angle changes the awning will produces less and less shade.

Thanks for your ideas about the awning project. I agree that a DIY project is much less costly than a Fiamma Awning. We had a Fiamma awning on our Lazy Daze RV(Class C), and it was great for us…most of the time. But with time, it developed problems until one day it started sagging. Then it ripped apart driving along the highway. Fortunately, no danger to us or van but needed replacement. After seeing the new price of $1500, we decided to sell the van as is after full-timing for seven years. Now that we have a small but cozy apt (we are in our eighties), we purchased a new Promaster High Top cargo van. Finishing the final steps of inside paneling this month, although we used it last summer on a two month road trip. Soon we’ll head down to Baja California for two months. Our challenge for the DIY awning is we have kayak racks on top with two kayaks using Hullavators. But with a DIY awning as you decribed, it should be easy. Happy Travels.
David Michael – you are the first person I have come across who has kayaks on top of their high top van. We are wanting to put kayaks on top of our hightop transit but I am worried it will be too high. Has it worked ok for you? Do you have a link to any pics?
We have never stored kayaks on our roof.
Curious about how you’re feeling about t his now? We don’t have a roof rack but I’m actually thinking about putting a light set of rails up there (also HR Transit) simply to act as a tarp standoff and this provide shade. We’d then attach the awning on the driver side, drape over the van, and provide the awning on the passenger side. Additional bonus would be water wouldn’t come between the van and passenger awning attachment as in a conventional tarp attachment.
Haven’t tried this yet, but that’s plan A. Are you still happy with your tarp-awning?
Yes, we are still happy but we find we don’t use it very often. We usually don’t sit still for too long. We really only break it out if we are going to set up for several days.
Where do you store your tarp and poles? Do you carry a ladder with you to reach the high roof to attach the tarp? Nancy
Tarp and poles are stored under the bed in a random nook. No ladder, I do some minor climbing on the tire and bumper to get it up, it is kind of dangerous.